NAMESPACE
A Kubernetes namespace is a way to organize and manage resources within a Kubernetes cluster. It provides a virtual cluster within the main cluster, enabling the separation of resources, such as pods, services, and deployments, into distinct groups. Namespaces are especially useful in multi-tenant environments or when working on multiple projects within the same cluster.
Key Points About Namespaces:
Resource Isolation:
- Resources in one namespace are logically isolated from those in another. For instance, two pods in different namespaces can have the same name without conflict.
Access Control:
- Namespaces can help enforce access control policies by limiting which users or service accounts can interact with resources in specific namespaces.
Default Namespace:
- If you don't specify a namespace, resources are created in the default namespace.
System Namespaces:
- Kubernetes includes some built-in namespaces:
- kube-system: For system components managed by Kubernetes.
- kube-public: For resources accessible across all namespaces (e.g., public config).
- kube-node-lease: Used for node heartbeats in clusters.
Scaling and Organization:
- Namespaces allow for clear segmentation of resources for staging, testing, production, or by team or project.
Namespace-Specific Operations:
- Operations like listing, updating, or deleting resources can be scoped to a namespace to avoid unintended changes.
Create Namespace from the Krack8 Console:
The user can create a new Kubernetes namespace under a cluster from the Krack8 console.
To create the console user will need to select the cluster and access group (Company or Team) Additionally User can fix the resource (vCPU, RAM, Persistent Volume, Bandwidth) or can select dynamic resource allocation.
If the Namespace is already created in an existing cluster that will be available in the cluster admin dashboard including all newly created namespace from the Krack8 platform.
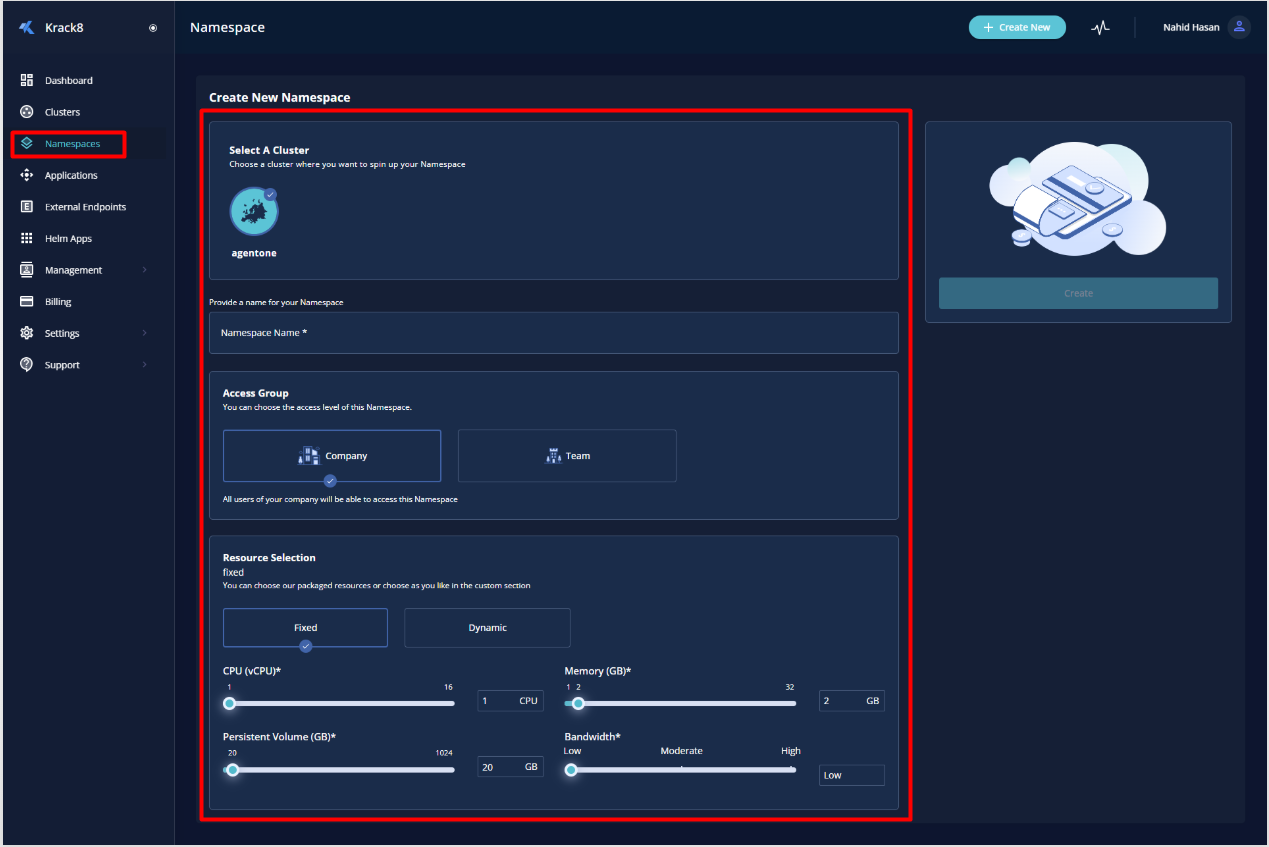
To create a “Namespace” user will go to Namespaces from the Menu and click on Create New button

A form will appear to take input for Namespace details
- Select a Cluster: User will need to select a cluster under which the namespace will be created.
- Namespace Name: A name for the namespace.
- Access Group: Users will need to select the access group. If a company selects everyone under that company will get access to space. If Admin wants to give access to a specific team then the Team option should be selected and a team name should be selected from the dropdown.
- Resource Selection: Now Admin will select the resource for the Namespace. It can be Fixed or Dynamic. If it’s fixed, the user can limit CPU, Memory, Persistent volume and Bandwidth.
If Dynamic selected then there will be no limit, full resource of this cluster can be used by this namespace if required.
After inputting and selecting all the details the user will click on the create button to create the namespace.
